Basic Class
|
Chapter Zero: Additional Notations on the Board
Before we begin to learn Othello, I would like to reintroduce the Othello board to you in my version of notation with some adaptations to what is currently commonly used. Beginning from the warmest colour, the RED X-SQUARES signify danger. They are commonly referred to the X-Squares in many Othello related literature and I will keep it that way in this writing. As we all know danger means something bad, we should always try to avoid it as much as possible. Next, we have the YELLOW C-SQUARES which are a tone down from the formerly mentioned X-Squares. The reason for the tone down in colour is because C-Squares are generally less dangerous than X-Squares. Hence, given two choices between a move to a C-Square or an X-Square, one should more often than not pick the C-Square to avoid danger! The BLACK A-SQUARES and B-SQUARES basically represents the core edges of the board and is usually highly crucial in the battle along the edges of both players which can ultimately affect the outcome of the game. Lastly, the BLUE 16-SQUARE ZONE is commonly known as the Sweet-16 which many beginner players like to revolve their maximising theory about. In addition, the BLUE S-SQUARES represent the key sub-corners which play a huge part towards the ending part of most games. With that out of the way, I hope all of us are now clear with the names of the key zones or squares that will be used throughout this class. Along the way, I will also introduce new terms, rules or definitions for teaching purposes. |
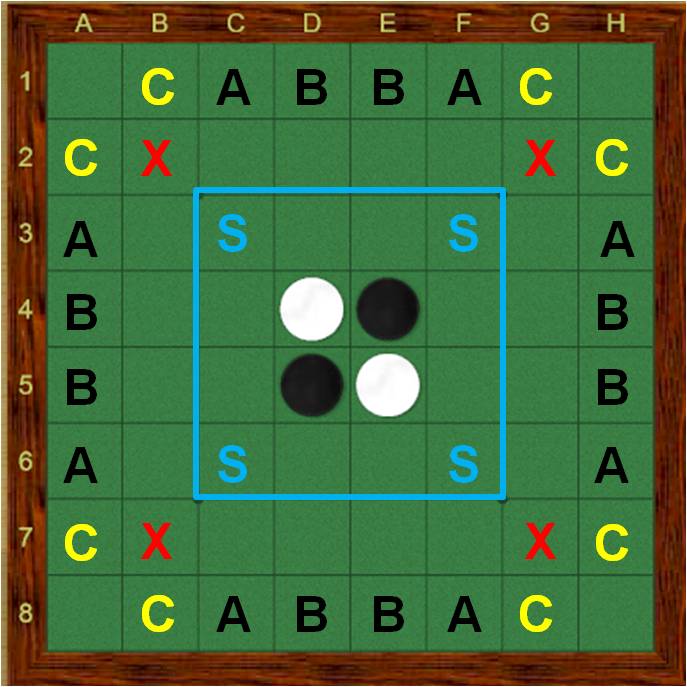
Figure 2A
|
|
Chapter One: Starting Out
There are going to be some Rules that I will impose in the basic class and do make sure you take them at face value and follow them accordingly for now. These rules will certainly keep adapting as you continue to learn more about the game. Explanation(s) will then be given after the rule(s) is/are stated. RULE NUMBER ONE: Never play into X-Squares or C-Squares at any point of the game unless you are really left with no other choice and quite essentially forced to do by virtue of the rules of the game. EXPLANATION: The idea here is simple, by virtue of the game rules, each of your move is dependent on where your opponent's discs are situated on the board. If you play into X-squares or C-squares which are diagonally or adjacent to the corners, you give your opponent an immediate opportunity to capture the corner. Corners refer to squares A1, A8, H1 and H8 respectively as observed in Figure 2B and they are also termed as Stable Discs which are good. |
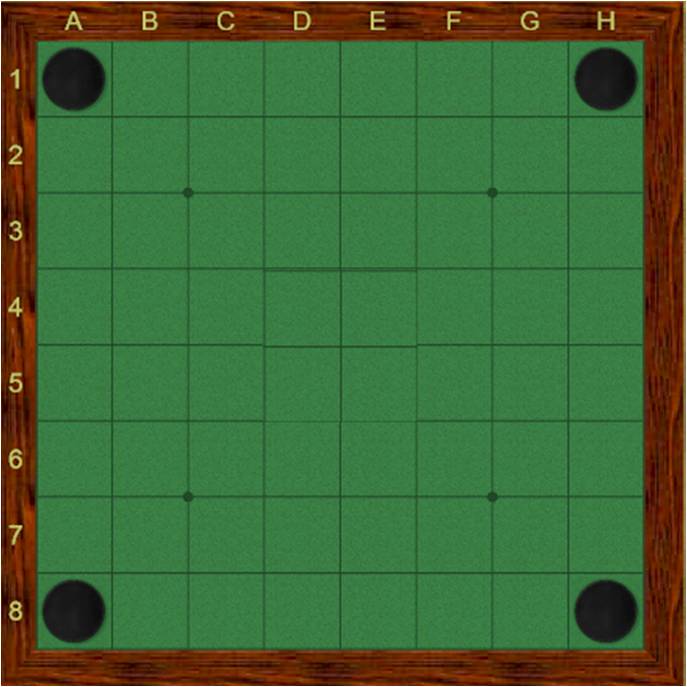
Figure 2B
|
|
If you observe the 4 black disc corners in Figure 2B above carefully, there is no way White can go around these 4 discs to sandwich it and flip it over based on the rules of the game.
These discs are therefore termed as Stable Discs because they will remain as your colour throughout the whole game irregardless of how your opponent's moves are played throughout the rest of the game. Looking at Figure 2C will tell you that discs of your colour that are adjacent to a corner (connected sideways) of your colour are stable too! Try and see if there is anyway for you to capture those black discs as a White player. Similarly, Figure 2D will show you that discs of your colour that are diagonally layered to a corner (follow the blue diagonal lines) of your colour are also stable! These two concepts will play a huge part in how to win a game effectively in the future. The objective of the game is to obtain at least 33 discs of your colour at the end of the game to win. Having an early lead of a considerable number of discs surely would not hurt. In fact, the more the merrier and this can be done by obtaining corners. |
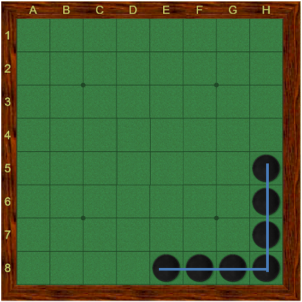
Figure 2C
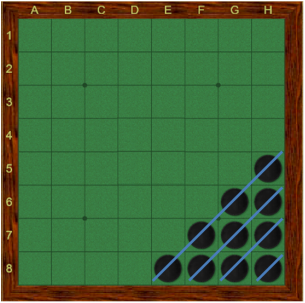
Figure 2D
|
|
Following the idea that corners are good, here is now the missing link between that idea and Rule Number One:
Figure 2E shows that if Black plays into the C-Squares or X-Squares in the game, you open up a possibility for your opponent (in this case White) to capture the respective corners by virtue of the rules of the game (needing to flip at least one opponent's disc per move). Generally, the earlier you give up a corner in the game to your opponent, the worse it gets. RULE NUMBER ONE: Never, and I say never play into X-Squares or C-Squares at any point of the game unless you are really left with no other choice and quite essentially forced to do by virtue of the rules of the game. I would prefer not to impose rules to restrict anyone in their way of Othello, but if you are able to follow this number one rule closely for now, you should be able to see a difference in your games or at least be a tad more difficult to be beaten by other players now. |
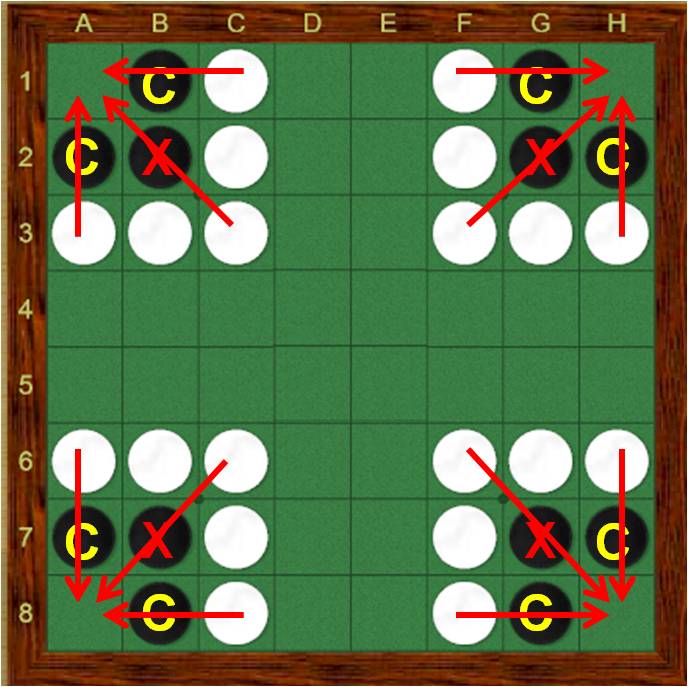
Figure 2E
|
|
Chapter Two: The Three Elements
Before we move into the key ideas here, we will first have to know what are Surface/Frontier Discs. They are the discs on the board which has at least one adjacent (vertical, horizontal or diagonal) empty square that can be played to. They are called surface discs because these discs are located on the surface or perimeter of the entire growing group of discs (including both black and white) in the game. In figure 2F, there are 5 surface discs in total for Black as marked by the green crosses. Similarly, in figure 2G, White has a total of 10 surface discs as marked by the red crosses. Obviously White has a much higher number of surface discs. Usually, the one with fewer surface discs, especially at the start of the game would be the side which is winning. This is due to more options to play for the player with fewer discs on the board. RULE NUMBER TWO: More surface discs is Bad, Fewer surface discs is Good ! EXPLANATION: The idea that is being conveyed here requires some patience from all of us to understand. Many people think that since the objective of the game is to have more discs of their colour at the end of the game, they should grab as many discs at the start as possible. In fact, the usual strategies of this group of people is they want to grab hold of all edges as much as possible in order to flip the most discs from end to end of the board as early as possible. This usually result in them having many surface discs. In fact, one too many surface discs. If you think in a similar manner, you might be totally mistaken. Here's the time to change that mentality! Please let me help you think a bit more here. First of all, think back to the rules of the game. Making a move requires you to sandwich or flip at least one of your opponent's disc. In other words, your moves or which direction you are headed to play on the board is very much dependent on where your opponent's discs lay at. In order to play a move, you need to place a disc of your colour on an empty square of the board. This means you will need at least one of your opponent's Surface Discs to make a move to its adjacent empty square. Secondly, recall Rule Number One earlier about not playing to X-Squares or C-Squares early in the game unless you are forced to do so because that might result in your opponent obtaining corners which are stable. Thirdly, remember that only discs of your colour are adjacent to a corner of your colour are stable. This means edges without a corner of your colour next to it is anything but stable. Thus, there is no point in collecting many edges at the start of the game without being able to secure corners first. Combining these three ideas together, we can then arrive at Rule Number Two. With fewer surface discs, you would be able to dictate more or less where your opponent must play to. You would then be able to force him to play X-Squares or C-Squares to give you corners. |
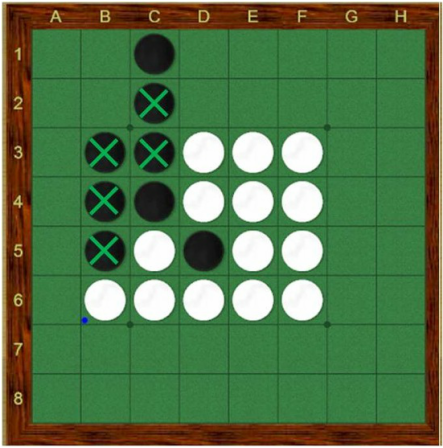
Figure 2F

Figure 2G
|
|
A typical midgame situation with a beginner playing as White with a more advanced player playing as Black is shown in Figure 2H. White is to play the next move. If you have not already realised, White has an overwhelming number of surface discs over here while Black has only 4. The 4 surface discs of Black are B4, B5, C2 and C3.
Looking more closely, White has only 3 choices to play while Black has many because White has so many surface discs. The 3 choices for white are namely A4, A6 and B2. All of these moves once played, will allow Black to immediately capture corners A1 or A8. More often than not, the advanced player playing Black obtaining these corners fairly early in the game will win a comfortable victory over the White player. The reason for White's loss would be then because of him or her flipping many discs at the start of the game resulting in this situation where he or she is faced with very limited and unattractive choices. Therefore, please remember Rule Number Two. We should always strive for fewer surface discs at the start of the game until you are able to force your opponent to give you a corner. |
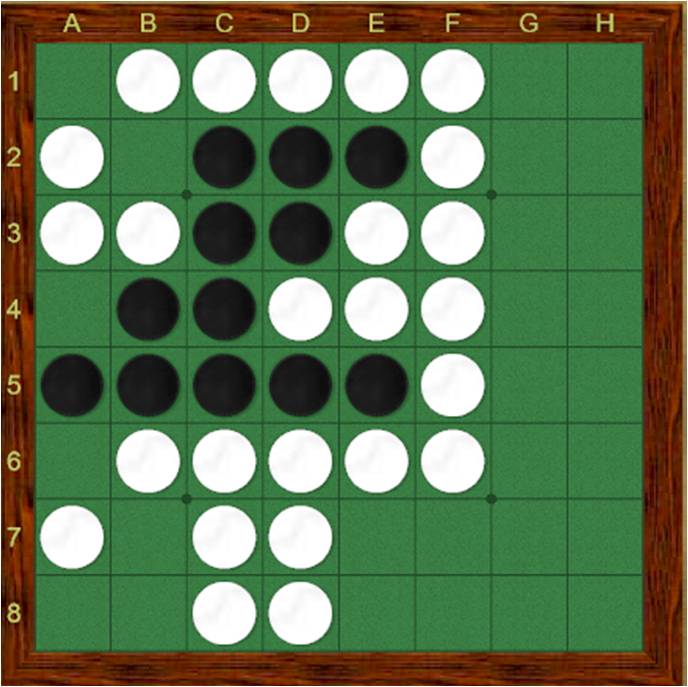
Figure 2H
|
The Three Elements
|
1) Small - By playing small I mean you should flip minimal discs per move to reduce the probability of you creating more surface discs for your opponent to play to (i.e. creating more moves for your opponent).
Figure 2J shows a very common opening example of how we should consider playing small. Basically, White has 5 possible moves here and C2 and E7 choices flips 2 of your opponent's discs while E2, C6 or D6 are moves that only flips 1 disc each. Hence, when I say play small, I mean to select moves that flip fewer discs. So we should first perhaps eliminate C2 and E7 unless those are your intended moves to varied or planned openings. This leaves us with 3 remaining choices. |
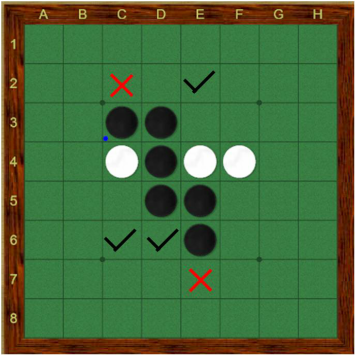
Figure 2J
|
|
2) Group - By playing group I mean you should try to always group your discs together in a compact manner with your moves and not let your discs lie all over the board.
Looking at Figure 2K, we examine the 3 remaining options we are left from the previous example. Over here, after the remaining 3 options are examined, D6 is selected over the other 2 moves in general because of the need to play group which means trying to group your discs in a most compact manner as possible. E6 move which presses directly against the core of the whole group of discs is one that is most effective in playing group. Moves to C6 and E2 pales in comparison to D6 because they cut diagonally in a way such that it leave empty squares in between the discs which allows Black to regroup back too easily. If grouping is good, we want to only do that for ourselves, and not allow your opponent to achieve the same thing. |
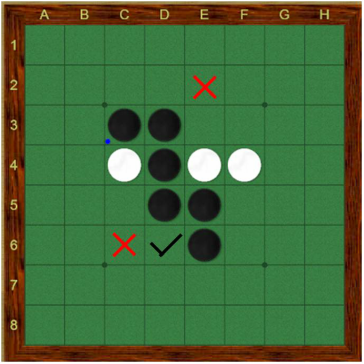
Figure 2K
|
|
3) Inside - By playing inside I mean you should try to always flip discs in the inner side of the whole group of discs so that you will not be creating many surface discs of your own.
Figure 2L shows that if Black plays to B5 he will only be flipping the two discs at D3 and C4. D3 and C4 are not surface discs which would create moves for White to play to. Thus, Black is said to be playing "Inside" by flipping two discs which are on the inner side of the entire group of discs. Black essentially only creates one surface disc to B5 for White to play to, which is the lowest number of moves you could perhaps create for your opponent in a single move. This would revolve around the Theory of Centralisation. |
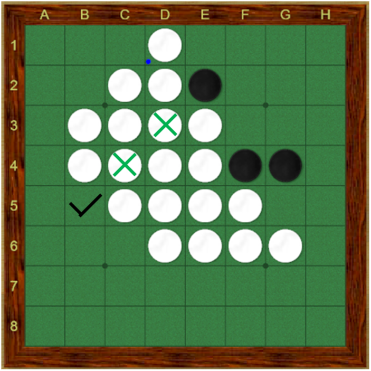
Figure 2L
|
|
Figure 2M shows another way Black could play "Inside" as well. If Black chooses to play into H3 here, White will only be left with 6 choices which are the 4 C-Squares and 2 X-Squares labelled in the diagram. Thus, White would be forced to give up at least one corner after Black identifies H3 as a move that plays towards the "Inside" without creating surface discs that is playable for White in squares which are not dangerous. Instead of centralising, this move to H3 is about the Theory of Edgeplay which could really be effective in winning games by huge margins. Fusion of the Three Elements In general, based on my experience, best moves in the first 20 odd moves for each player will always carry at least one of these three elements mentioned above. It is common that best moves could also be a fusion of two or all three of these elements mentioned above. Thus, it is highly crucial that one learns how to play moves that align with these three guidelines. If you are able to fully understand these guidelines to good moves as such, you should be able to do fairly well in the opening and midgame. |

Figure 2M
|
